Tasks
Tasks are collections of input topics, processors and output topics; these define the data flow from inputs to outputs. A task can be started to initiate the data flow and it can be stopped to end the data flow.
Add Task
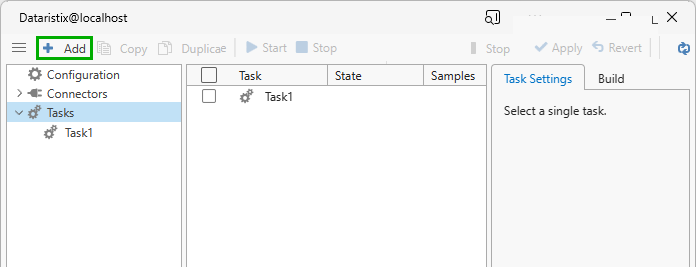
Select the “Tasks” node in the navigation panel and click “Add” to add an empty task. The task will initially have default settings with no connector or processor added.
Edit Task Settings
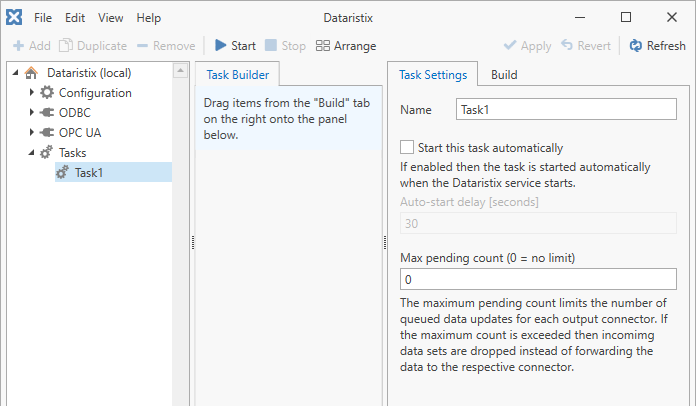
Select the task in the navigation panel to edit its settings. Settings are:
- Name
- The task’s name.
- Start this task automatically
- If ticked, then the task is automatically started when the Dataristix Core Service starts. By default, the service is configured to start automatically and in that case tasks will start automatically after a reboot, for example.
- Auto-start delay
- The number of seconds the auto-start should be delayed for; useful if data sources need some initialisation time, for example, to avoid intial error messages.
- Max pending count
- Dataristix maintains an in-memory data update queue for each output connector. The maximum pending count limits the number of queued data updates for each connector. If the maximum count is exceeded then incomimg data sets are dropped instead of forwarding the data to the respective connector. Setting the “Max pending count” property to zero (the default) means that there is no limit on the number of queued updates.
- Disable input value collation
- By default, input values are collated, meaning that, if multiple values for the same tag arrive exactly at the same time, then generally only the last received tag value is progressing through the pipeline. Check this option to process each value received for the same tag separately, thus running the pipeline possibly multiple times. An example where this may be useful is shown for the MQTT connector.
Add Input Topics
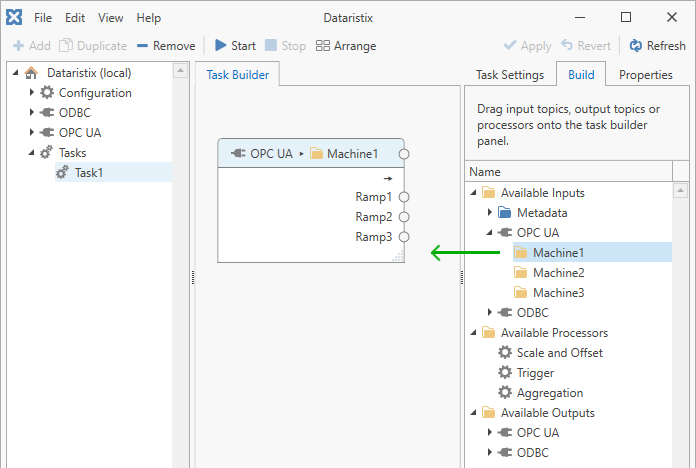
Add input topics by dragging the topics from the “Build” panel on the right onto the “Task Builder” panel in the center. If you don’t see any available input topics then no connector topics may have been created yet or connector topics may be write-only; please check the topic configuration in the relevant connector or try to “Refresh” the view.
Replace Input Topics
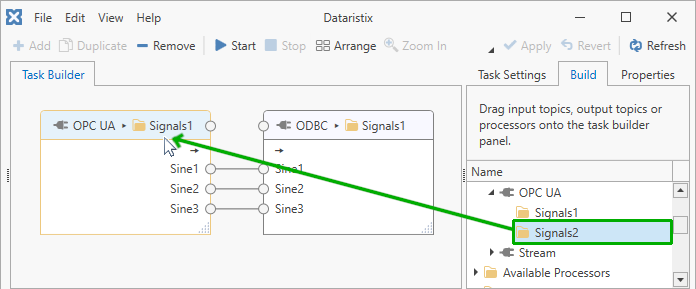
To replace existing input topics within the task, drag a different input topic from the task builder onto the task builder panel and point at the input topic’s title bar. You will see the border of the input topic highlighted in orange color.
To successfully replace an input topic, the new input topic must have the same number of tags with matching tag names. It is not required for the new input topic to originate from the same connector.
Add Output Topics
Add output topics by dragging the topics from the “Build” panel on the right onto the “Task Builder” panel in the center. If you don’t see any available output topics then no connector topics may have been created yet or connector topics may be read-only; please check the topic configuration in the relevant connector or try to “Refresh” the view.
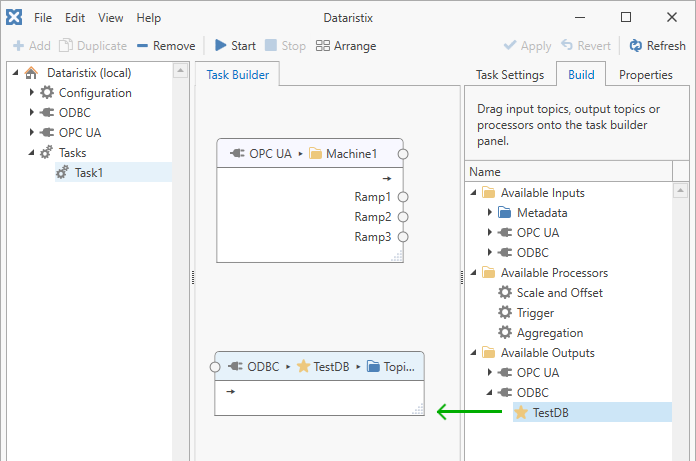
Replace Output Topics
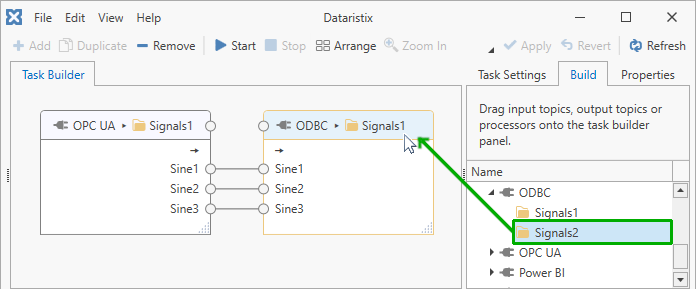
To replace existing output topics within the task, drag a different output topic from the task builder onto the task builder panel and point at the output topic’s title bar. You will see the border of the output topic highlighted in orange color.
To successfully replace an output topic, the new output topic must have the same number of tags with matching tag names. It is not required for the new output topic to originate from the same connector.
Add Processors
Optionally, add processors. Drag the processor from the “Build” panel on the right onto the “Task Builder” panel in the center.
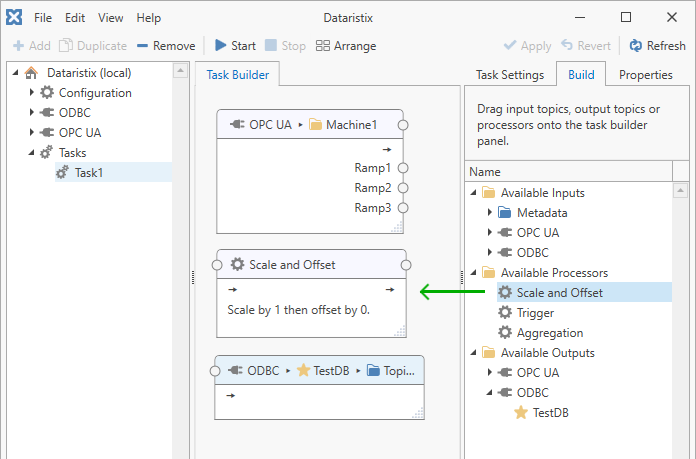
Right-click on the title bar of the processor within the task to duplicate the processor with all it’s settings.
Tip
When there are many tags in input or output topics that are processed in the same way, then it may be easier to “collapse” all tags into a single group of tags. To collapse tags, right-click on the task node within the task builder panel and select “Collapse”. You can now connect the collapsed group of tags like a single tag to define your dataflow. To expand the tag group again, right-click and select “Expand”.
Add Core Task Nodes
Optionally, add Core task nodes to the task. These are either inputs or outputs provided by Dataristix, comments, or building blocks as a combination of other task nodes.
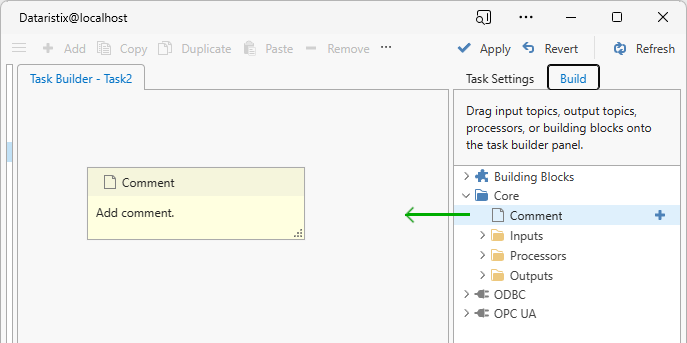
Core Comments
Comment task nodes simply display some description that you provide. These are not relevant for task processing or task logic. Use comments to describe what your task does or explain the task pipeline.
Core Inputs
These are inputs that are generated by Dataristix. Drag a topic from the “Build” panel on the right onto the “Task Builder” panel in the center.
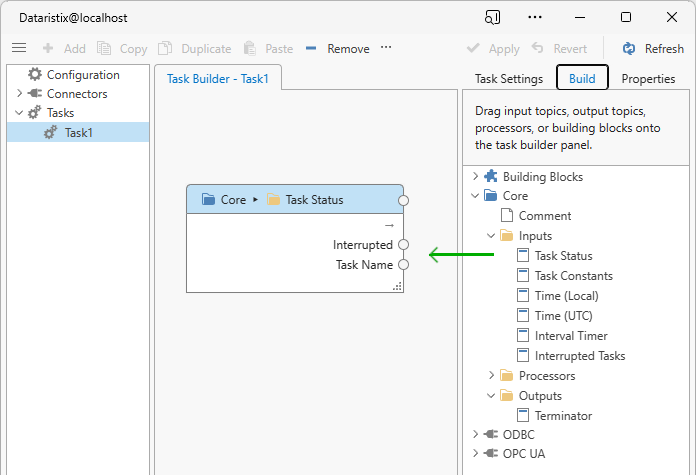
Core inputs can be used to control the dataflow within the task in combination with the Trigger processor. Available input topics are:
- Task Status
- The task status includes a boolean flag indicating whether the task is in an interrupted state.
- Task Constants
- Task constants are typed, scalar values that feed into the task’s data flow (please see the next section for more details).
- Time (Local)
- This input topic contains date and time values for local time; use it to trigger dataflows in regular intervals or at certain times.
- Time (UTC)
- This input topic contains date and time values in Univeral Time Coordinated; use it to trigger dataflows in regular intervals or at certain times.
- Interval timer
- A periodic timer that generates a signal at a specified interval. The signal value is a 32-bit unsigned integer that wraps around to zero after the maximum value is reached.
- Interrupted Tasks
- Provides two input values: A comma separated list of tasks that are currently in the interrupted state (or empty if there is none) and the number of interrupted tasks.
Core Outputs
Use the available “Terminator” output as a monitoring node showing output values or as a node within building blocks to hide unwanted building block outputs.
Use the “Telemetry” output (available in Dataristix Core version 2.0.75 or later) to send numerical values as metrics to your OpenTelemetry collector as configured..
Building Blocks
Building blocks are single pre-configured task nodes or groups of task nodes. Use building blocks for re-use in other tasks. To add a single task node to your building blocks, right-click on the node and select “Add to Building Blocks”. To construct a building block consisting of multiple task nodes, select two or more task nodes within an existing task, then click “Group” in the toolbar. This will combine selected task nodes into a single group node as shown in the image below. Right-click on the group node to “Add to Building Blocks”.
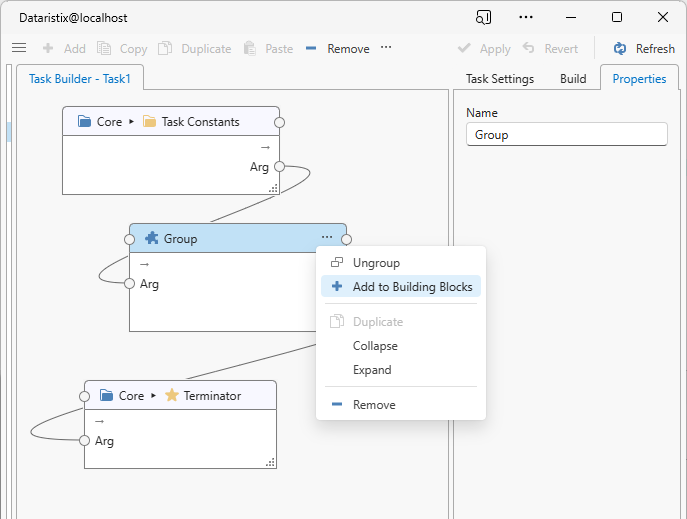
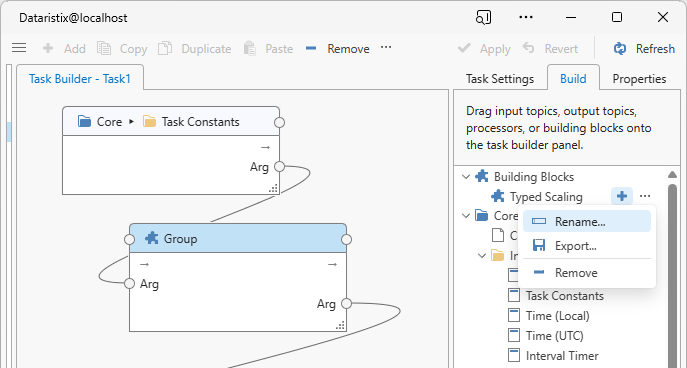
Rename the building block to suit, either by renaming the group node before adding the group as a building block, or later by right-clicking on the building block node in the build tree.
Task Constants
When task constants are added to the task builder panel, then no constants are initially defined. Follow these steps to configure constants.
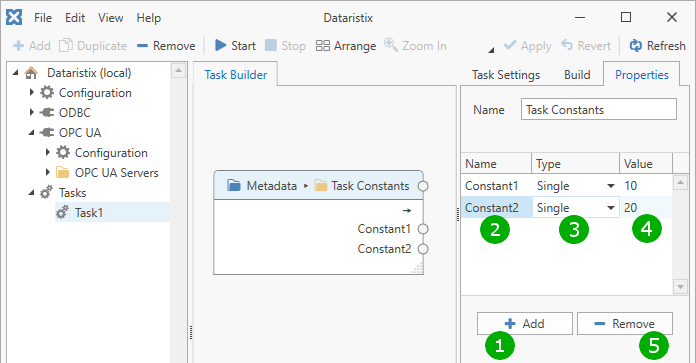
( 1 ) Click on the “Add” button to add a new constant.
( 2 ) Enter a name for the constant.
( 3 ) Select a data type for the constant. This data type is used within the task’s dataflow.
( 4 ) Enter a value for the constant. The value should be valid for the chosen data type. An attempt is made to convert the entered value into a value of the given type; if the conversion fails then the value is considered invalid and the value is shown in red color. Supported data types are:
- “Boolean”, “True” or “False”
- “Byte”, unsigned byte (8 bits)
- “DateTime”, a date and time value, i.e. “2021-06-01 13:24:59”
- “Decimal”, a 128-bit number
- “Double”, a double precision floating point number
- “Guid”, a globally unique identifier in the form, i.e. “FE2EA588-BE48-42cb-A04B-7B1BFEB1B46A”
- “Int16”, a 16-bit signed integer
- “Int32”, a 32-bit signed integer
- “Int64”, a 64-bit signed integer
- “SByte”, a signed byte (8 bits)
- “Single”, a single precision floating point number
- “String” (text)
- “UInt16”, a 16-bit unsigned integer
- “UInt32”, a 32-bit unsigned integer
- “UInt64”, a 64-bit unsigned integer
( 5 ) To remove a constant, select the constant(s) and click the “Remove” (“-”) button.
Press the “Apply” button in the main window toolbar to commit all changes.
Connect Task Items
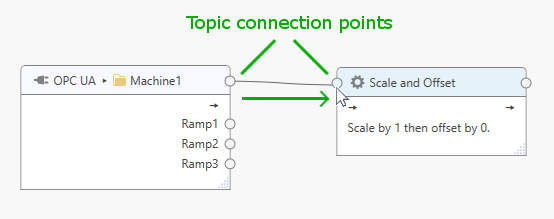
Connect input topics to processors or output topics using the task builder. Each item within the task builder panel (topics and processors) has topic connection points and may have tag connection points.

Topic connection points work on all tags within the topic; tag connection points work on individual tags. To connect items, click on a connection point and drag the appearing line onto a connection point of another item. You can connect:
Topic connection point → Topic connection point
Drag an input topic connection point to an output topic connection point to generate connections for all tags of the input topic (for Generic output topics) or to match tags by name.
Tag connection point → topic connection point
Drag a specific input tag connection point to an output topic connection point to generate a connection for an individual tag (for Generic output topics) or to match an individual tag by name.
Tag connection point → tag connection point
Drag a specific input tag connection point to a specific output tag connection point to connect individual tags.
If the output connector topic is a “Generic” topic (accepting any input tags) and the output connector task item is first connected using the topic connection point then the final output topic name is set to the name of the preceding topic or processor. You can change the final name by editing task item properties.
The following sections describe typical connection steps to create a functioning task.
Connect Input Topic to Processor
To connect all tags within the “Machine1” topic to the “Scale and Offset” processor (see example below), click on the topic connection point and drag the line that appears onto the topic connection point of the processor.
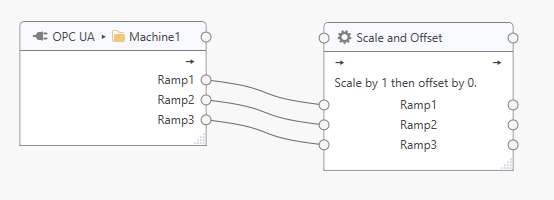
This will generate corresponding tags and tag connections for the processor.
Connect Processor to Output Topic
Click on the processor’s outgoing topic connection point and drag the appearing line onto the output topic connection point.

In the example above the output topic is a “Generic” topic that accepts any tags; corresponding tags and tag connections will therefore be generated for the output topic.

For output topics that have specific tags, either connect each tag to the target topic connection point to match the tag by name, or connect tag connection point to tag connection point.
If the output connector topic is a “Generic” topic (accepting any input tags) and the output connector task item is first connected using the topic connection point then the final output topic name is set to the name of the preceding processor. You can change the final name by editing task item properties.
Edit Task Item Properties
Click on a task item in the task builder panel to view or modify its properties. Properties are displayed on the right of the task builder panel. You can:
- View an input topic name
- View or modify a processor item name
- View or modify processor settings (for example, to modify the scale and offset values for the “Scale and Offset” processor)
- View the output topic name
- View or modify a “Generic” output topic name
Note
The output topic name for a “Generic” output topic may determine the name used by the connector when storing data into the underlying data store. For example, the ODBC connector will use the configured “Generic” output topic name, prefixed by configured table name prefix (“D_” by default), as the table name for storing data. In the image below, the ODBC connector will attempt to store data into table “D_SignalsDataTable” if the default prefix is used.

Disconnect Tags
To disconnect tags, click on the incoming tag connection point then drag the appearing line to somewhere else on the background panel.

The tag connection will be removed when the mouse button is released. If the target is a generic topic, then the tag itself will also be removed from the target, unless “Cascade Lock” is enabled on the topic. Press the Escape key to abort.

Remove Task Items
To remove any item from the task, click on the item and press the Remove button in the tool bar or right-click on the item header and select Remove from the context menu.

Cascade Lock
When tags are disconnected from a generic task node then the task node will usually remove tags from the task node and any subsequent generic task nodes automatically, resulting in a cascading effect that may remove tags from multiple task nodes at the same time. If this is not desired (i.e., when reconstructing parts of the task pipeline), then “Cascade Lock” can be activated for the generic task node via the context menu (see image above). With Cascade Lock enabled, no tags are removed when a tag is disconnected.
Start Tasks
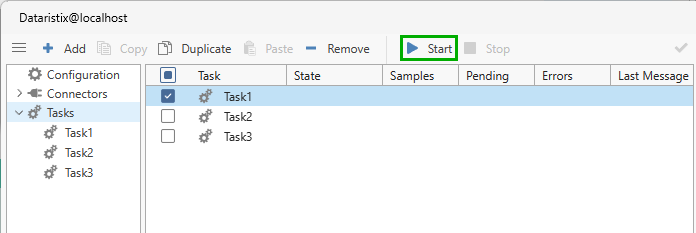
Select the “Tasks” node in the navigation panel and select one or more tasks from the list in the content panel. Press the “Start” button to start the selected task(s).
Tip
You can also use the right-click menu to start individual tasks.
Inspect the message panel for any error relating to the tasks. If anything goes wrong, then error messages will inform about the cause and the task icon will indicate an error.
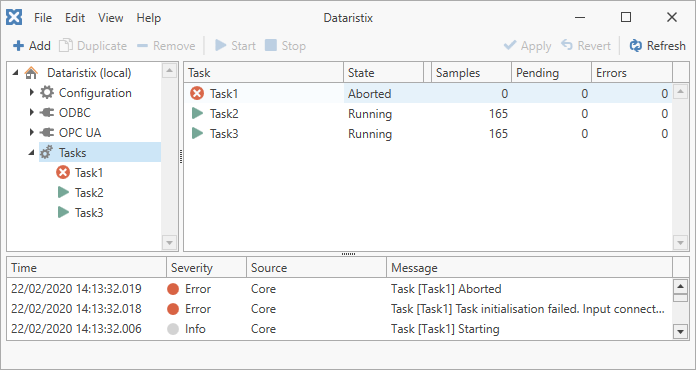
Tasks may be in a state of:
Stopped
The task has not been started.
Starting
The task is preparing to start.
Running
The task is running normally.
Stopping
The task is preparing to stop.
Interrupted
The task is not running due to an error but may recover and continue to run later.
Aborted
The task has encountered an error and cannot continue to run.
Value Propagation
General
Input values propagate through the task pipeline until they reach a connector task node, for example a connector output node or a connector processor node.
If input values diverge into different paths before reaching the connector node, then all paths are evaluated before writing datasets to the connector. For example, the following task receives a “Signal” value, multiplies the value by two in another path, and sends the result to an ODBC connector. The ODBC connector will receive complete datasets consisting of the original “Signal” value and the “Signal Times Two” value in a single transaction.

If new input values arrive before output values could be processed by the output nodes, then input values run through the pipeline up to the point where they would be sent to the output connectors. Here they are queued as “pending” values. The task’s “Pending Count” shows the number of pending samples.
The “Pending Count” will also increase when an output connector fails to process a dataset. If there are multiple output connectors, and a specific one fails, then this will prevent the task pipeline from continuing with the next input value dataset for the failed connector, while other output connectors may continue to process new values. The pending dataset is sent to the connector again for retry. Once a failed connector has successfully processed the pending dataset, the task moves onto the next input value dataset in the pending queue for the failed connector.
If a task has multiple output nodes then all paths are evaluated before any output values are written, however, there is no guarantee in which order outputs are sent to the different output connectors.
Parallel paths
In general, incoming tag values move from task node to task node in batches and the target node therefore has the opportunity to evaluate an arriving set of tag values at the same time. However, if there are paths originating from diffent nodes, then there is no guarantee which set of paths is evaluated first. This may need consideration when constructing task logic. Continuation point processors may be used to handle value propagation for parallel paths deterministically, as shown in the following examples.
Consider the following task.

The task receives a “Temperature” value, multiplies the value by 1.8, adds 32, and then stores the value into an ODBC database as long as the data stream is enabled as indicated by the “EnableDataStream” value.
Tag values for “EnableDataStream” and “Temperature” may arrive at the same time, but there is no guarantee whether path (1) or path (2) is evaluated first. That means, if both values arrive at the same time and the “EnableDataStream” value changes from True to False, then the “Temperature” value may still be stored into the database if path two is evaluated first (because the “Trigger” still holds the previous True value for “EnableDataStream”).
If the “EnableDataStream” and “Temperature” tags are independent, then this is fine. We just want to ensure that data storage stops at about the right time.
Now consider a scenario where these tags are correlated. For example, a device may have a configuration containing a temperature threshold and it sets the “EnableDataStream” value according to its internal logic. Data obtained from the device always arrives as a consistent set of “EnableDataStream” and “Temperature”, and the temperature value within that dataset must only be stored if the “EnableDataStream” is True.
As illustrated before, without any modifications to the task logic, this cannot be guaranteed.
To avoid ambiguities arising from parallel paths, a Continuation Point Processor should be inserted into the task:
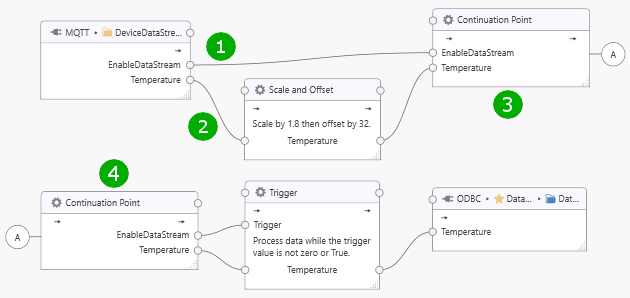
Continuation points merge parallel paths into a single node and propagate values only after the paths leading into the continuation point have been evaluated. That means, paths (1) and (2) leading into continuation point (3) will be evaluated before continuation point (4) feeds a consistent set of data into the “Trigger” node for evaluation.
Note
Note also that external processors (connector modules used as processors) always execute asynchronously and the continuation point will not have values originating from the external processor on the first pass. Adapt your task logic as required; for example, use a trigger processor with mode “Process when any trigger value is received” and the external processor output connected to the trigger item to pass through a set of values when the external processor has delivered a result.
Monitor Tasks
Click on a task to inspect live values as they flow through the task stages. Live values are displayed next to tag names in input and output topics. Green values indicate values of “Good” quality, orange values indicate “Uncertain” quality, and red values indicate “Bad” quality. Hover over a tag value to view timestamp and status information.

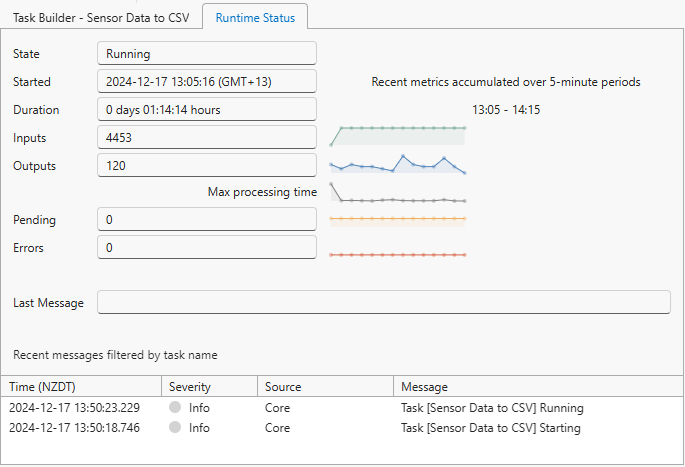
Dataristix Core version 2.0.212 or later provide an additional “Runtime Status” panel next to the task builder panel, providing further details:
- State of the task (see task states above)
- Start date and time of the task
- How long the task has been running for
- Number of inputs received (equivalent to the number of samples as indicated in the task list)
- Number of outputs sent (this number may be lower than the number of inputs, for example, when Trigger processors are used)
- Pending outputs count
- Error Count
Further, spark lines are displayed that show counters for (up to) the previous 3 hours accumulated over 5-minute periods, including the maximum processing time, measuring the time it took for output connectors to process any values passed onto output nodes.
Stop Tasks
Select the “Tasks” node in the navigation panel and select one or more running tasks from the list in the content panel. Press the “Stop” button to stop the selected task(s).

Tip
You can also use the right-click menu to stop individual tasks.
Tip
To create similar tasks, select an existing task in the content panel, use “Duplicate” to create a copy, then edit the new task as required.
Tip
If you have configured an output connector with a “Generic” topic (for example, the ODBC connector) then you can right-click on an input connector topic (for example, an OPC UA topic) and select “Send to” to quickly create a task that transfers data from the input topic to the “Generic” topic.
Import/Export Tasks
You can export tasks and import them later into a project on the same computer or elsewhere. Tasks are exported as partial projects including any connector topics that are referenced within the task. Importing tasks will not overwrite existing tasks or connector topics.
To export tasks, right-click on a single task in the navigation panel or content panel, or select multiple tasks in the content panel, then right-click on a selected task.
To import tasks, right-click on the “Tasks” node in the navigation panel, then select the previously exported tasks file.
For more information about task and project import and export options, please see the the “Projects” section below. Available project export options apply to tasks also.
Import/Export Building Blocks
To export or import building blocks for use in a different project, right-click on “Building Blocks” in the build panel and select “Export” or “Import” from the context menu. Like tasks, building blocks are imported or exported as partial projects, containing connector dependencies only.