User Access Control
Overview
Dataristix for Kubernetes is deployed with your preconfigured user in the administrator role and User Access Control is enabled by default. On Windows platforms or on containerized Dataristix instances, User Access Control is disabled by default, and all functionality of Dataristix is accessible by Windows users logged in to the local computer or by users of a containerized application who have access to the container instance. On these platforms, it is recommended to restrict access further by enabling User Access Control within Dataristix and by configuring users in a number of predefined roles. These roles are:
Enable User Access Control
Goto the “Configuration” node in the navigation panel and select the “Users” tab to view current settings. If you have not added a user in the Administrator role yet, then please do so before ticking the “Enable User Access Control” box to enable User Access Control:

With User Access Control enabled, users will be prompted for user name and password when they open the Dataristix application.
Authentication Options
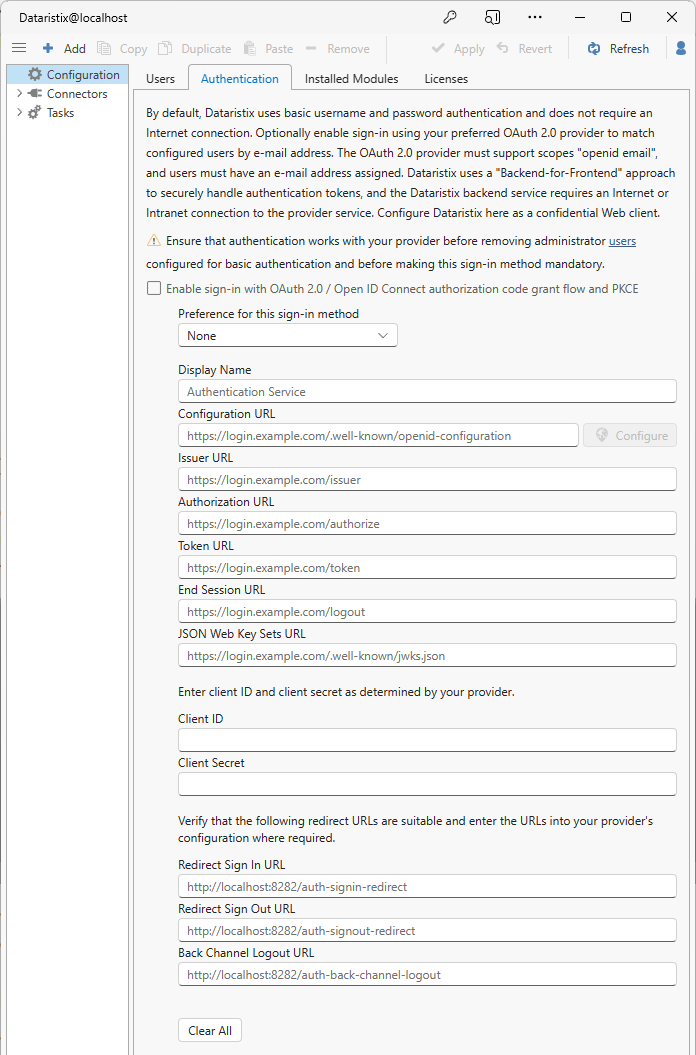
By default, Dataristix uses basic username and password authentication. When users login, username and password are sent to backend services and, if successful, an authentication token is returned for further requests. Alternatively you can configure OAuth authentication under the “Authentication” tab, either as an additional option or as the only way for users to sign in to Dataristix.
To configure OAuth authentication, you will need to add Dataristix as a trusted client to your OAuth provider, then follow these configuration steps:
- Check the “Enable sign-in…” box.
- Select a preference for the OAuth sign-in method. Starting with “None” is a good option until everything is working reliably as this will offer both, Basic and OAuth sign-in options in the login dialog. You can change this to “Mandatory” later.
- Enter a public display name for the Authentication service. This name will appear in the sign-in dialog for OAuth preference setting other than “Mandatory”.
- Enter a configuration URL ending with “openid-configuration” and press “Configure”. This will fill out the following fields automatically. If there is no configuration URL, then you can also edit the fields manually.
- Obtain the Dataristix client ID and client secret from your provider and enter those into the respective entry fields. The client scope that you configure in your provider settings must include “openid” and “email”.
- Review the given redirect URLs. These will point to the Dataristix host currently visited and should work for a local setup. Adapt to suit your network environment.
Sign In
Once User Access Control is enabled, users are presented with a sign-in dialog when opening the browser application. If OAuth authentication is disabled, then users are requested to enter their username and password. If OAuth authentication is enabled but not mandatory, then users can either enter their basic username and password but also have the option to login via OAuth using your authentication provider.

If OAuth authentication is mandatory, then the authentication provider’s sign-in dialog is shown instead and built-in Dataristix authentication is disabled.
Sign Out
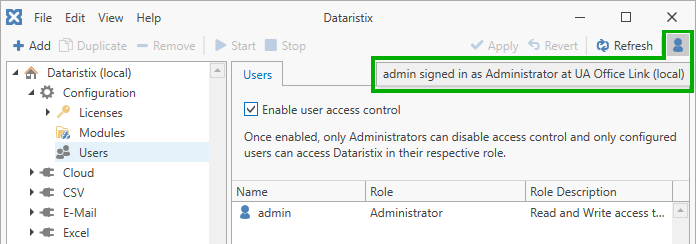
With User Access Control enabled, the toolbar displays a “User” button in the top right corner. To sign out, press the button and select “Sign Out” from the menu.
Add Users
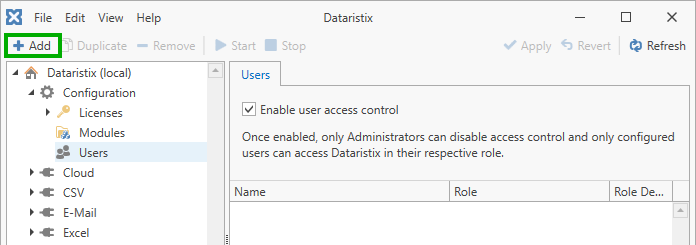
Goto the “Configuration” node in the navigation panel, select the “Users” tab, and click on the “Add” toolbar button to add another user.
You will be prompted to enter user details and assign a role to the user. Ensure to select the OAuth authentication scheme if use of your configured authentication provider is mandatory.
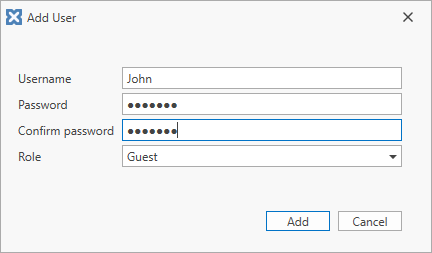
Click the dialog’s “Add User” button to add the user.
Warning
Take note of your chosen Administrator user name and password because only Administrators can disable User Access Control, add other users, or manage licenses. If you cannot remember your Administrator account credentials, then please contact support.
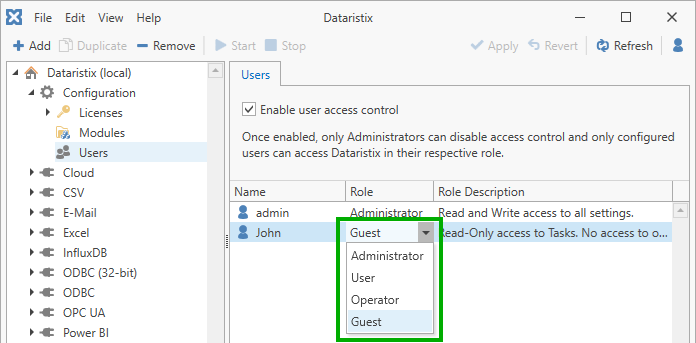
Change User Role
Goto the “Configuration” node in the navigation panel, select the “Users” tab, then select a user on the right and click on the Role name to select a different role from the dropdown.
Remove Users
Goto the “Configuration” node in the navigation panel, select the “Users” tab, then select the user to remove on the right and click on the “Remove” toolbar button. You can also right-click on the user name to select “Remove”.
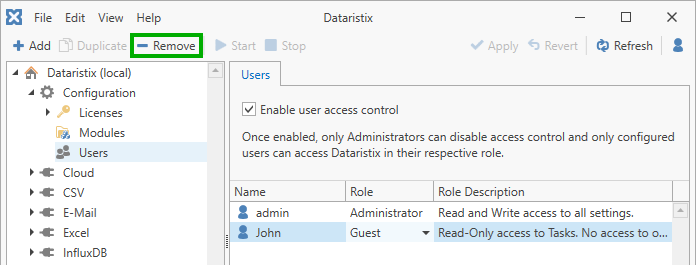
Note that you cannot remove the signed-in user. Either sign in as a different Administrator or disable User Access Control before removing the desired user.
Disable User Access Control
Dataristix users in the Administrator role can disable User Access Control by unticking the “Enable User Access Control” check box. Configured users will remain.
Warning
Once User Access Control is disabled, all users with access to the Dataristix instance can view or modify all settings.