Topics
Add Topics
To add topics, click the “Add” button with the database selected in the main application’s nagivation pane. A topic with a default name and settings will be created. Topics usually target one table in the database (custom queries may be used across different tables) but different topics may target the same table. The latter is useful in combination with Update queries (see below) where different topics may update different rows in the same table.
“Generic” Topic
By default a “Generic” topic is created (marked with a star icon). This kind of topic is preconfigured as “Write-Only” to insert data into the database.
When a “Generic” topic is added as a task output then the Database Connector will accept any tags that are connected to the generic topic without defining any tags for the database topic itself.
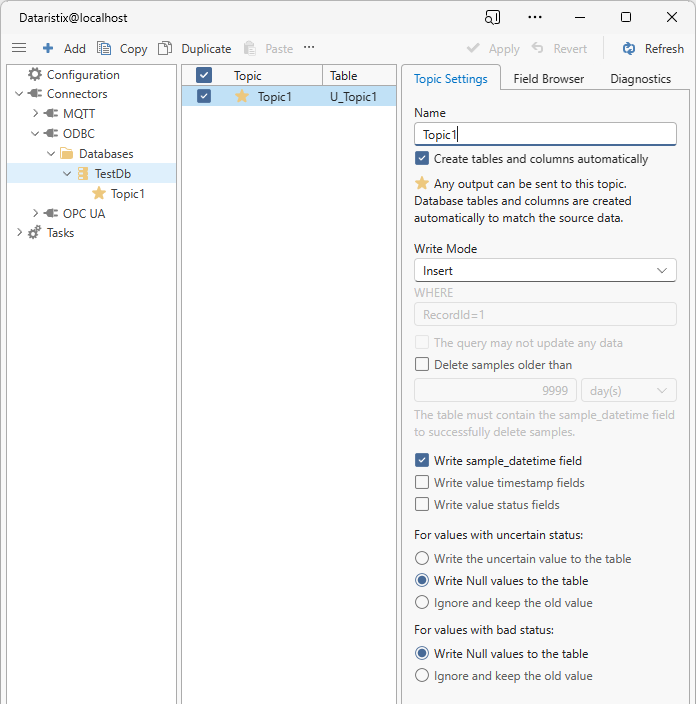
Write options for “Generic” topics exclude custom queries but are otherwise the same as for specific topics as described in the following section. “Generic” topics are great for testing and initial setup, however, you may want to consider unticking this option later, restrict database access and configure tag connections manually.
Specific Topic
Specific topics require manual configuration of tags and tag connections. To turn a “Generic” topic into a specific topic, untick the “Make this a generic topic” option in the table settings, “apply”, then drag tags from the field browser into the topic folder or add tags manually by pressing the “Add” button.
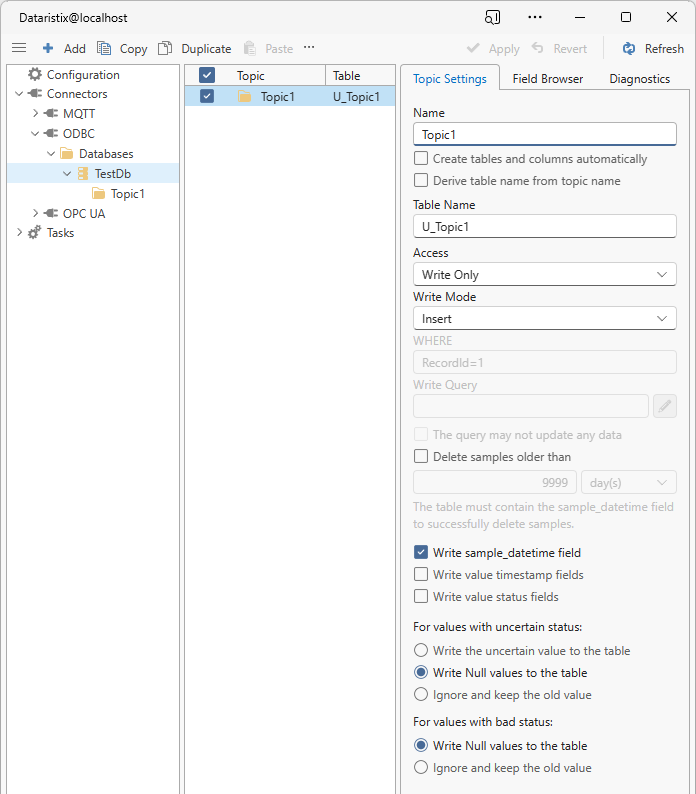
Topic Settings
Table options are:
- Table name
The table name can either be derived from the topic name or entered manually. Derived table names take on the topic name with non-valid SQL characters replaced with underscore or will be enclosed in delimiters according to identifier settings when querying the database.
- Make this a generic topic
Check this option to create a generic topic as described above.
- Create tables and columns automatically
This option is available for Write-Only topics. With this option enabled, the database connector will attempt to create matching tables and columns automatically, based on the tags that are connected to the topic in tasks. For table creation to work, the database connector must have the required access rights to the datatabase.
- Access
How the topic should be accessed, either “Read Only”, “Read and Write”, “Write Only”, or “Process”. If Read-Only, then Dataristix will allow use of the topic as task input only. If Write-Only, then Dataristix will allow use of the topic as task output only. If Read and Write then the topic can be used in inputs as well as in outputs.
If “Process” is selected then the topic appears as a “Processor” in the task builder with input and output tags. Write Mode and Read Mode options are not available in this instance and access to the database is defined by a process query; see more details in the next section.
- Write Mode
- Insert
Insert rows into the table. A new row always stores full datasets, even if some data has not changed. For example, if there are five tag values to be stored into the table and a single new tag value is received then the full data set is constructed from four cached values plus the new value to form a full dataset.
- Update
Updates a single row in the database. This option either requires a table that contains one row only or a “Where” clause must be specified that identifies a single row. When new values are received then these values are updated within the row.
- Custom Query
A custom query must follow a specific syntax using place holders for values received. Placeholders are substituted with actual values before the query is executed.
The custom query is executed instead of the standard Update or Insert query and can take on any form. Tag value placeholders within the custom query are replaced with actual values before the query is executed. Placeholder must begin with ‘@’ followed by the tag name. For example, the following custom query is equivalent to the standard Insert query for the tags “Random_Real4” and “Random_Real8”, including storage of the sample datetime field.
insert into U_Topic1 (sample_datetime, Random_Real4, Random_Real8)
    values ({ts @sample_datetime}, @Random_Real4, @Random_Real8)
If quoted identifiers or otherwise enclosed identifiers are used then the ‘@’ character must precede the enclosed identifier:
insert into U_Topic1 (sample_datetime, Random_Real4, Random_Real8)
    values ({ts @"sample_datetime"}, @"Random_Real4", @"Random_Real8")
- The query may not update or insert any data
This option is enabled for “Update” or “Custom” queries. If checked, then no error is reported should the query not insert or update any data.
- Delete samples older than
This option is available when the write mode is “Insert” and when the “sample_datetime” field is stored into the table. When enabled, the Database Connector will begin deleting old samples one minute after starting a task that targets the topic. After the first minute, old samples are deleted periodically:
- Minutes
- If the selected time unit is Minutes then old samples are deleted every minute.
- Hours
- If the selected time unit is Hours then old samples are deleted every hour.
- Days
- If the selected time unit is Days then old sample are deleted once a day.
Note the subtle difference between option “delete records older than 24 hours” and “delete records older than 1 day”. In the former case the oldest record in the database may become as old as 25 hours, in the latter case the oldest record may become 2 days old.
- Uncertain value options
- Write the uncertain value to the table
- When a tag value with “uncertain” status is received (following the OPC UA meaning of “uncertain”) then the uncertain value is written to the table like a “good” value would be.
- Write Null values to the table
- When a tag value with “uncertain” status is received then a Null value is written instead.
- Ignore and keep the old value
- When a tag value with “uncertain” status is received then it is ignored. For Update queries, this value will not be updated and for Insert queries the old value remains in the cache to form full datasets.
- Bad value options
- Write Null values to the table
- When a tag value with “bad” status is received (in the OPC UA sense) then a Null value is written instead.
- Ignore and keep the old value
- When a tag value with “bad” status is received then it is ignored. For Update queries, this value will not be updated and for Insert queries the old value remains in the cache to form full datasets.
- Read Mode
- Select
In “Select” mode the database is polled at the specified read rate by issuing select queries. The query must return a single row only, either because the topic’s table contains one row only or because the “Where” clause identifies exactly one row. When changes in data are detected then changed values are sent to the task for further processing.
- Custom Query
A custom query must return a value for each tag within the topic, matched by name. The query may be a “SELECT” statement or a stored procedure call returning a single row only.
select sample_datetime, Random_Real4, Random_Real8
from U_Topic1
where RecordId=1
Quoted or otherwise enclosed identifiers may be used as required.
select "sample_datetime", "Random_Real4", "Random_Real8"
from U_Topic1
where RecordId=1
- Read rate
The frequency in milliseconds at which “select” queries or custom read queries are sent to the database.
“Process” Access
When “Process” is selected as the topic access mode then a custom process query must be defined to access the database. This query may execute a select query or stored procedure expecting zero or more arguments and returning zero or more results, or it can be another form of query storing or returning data.
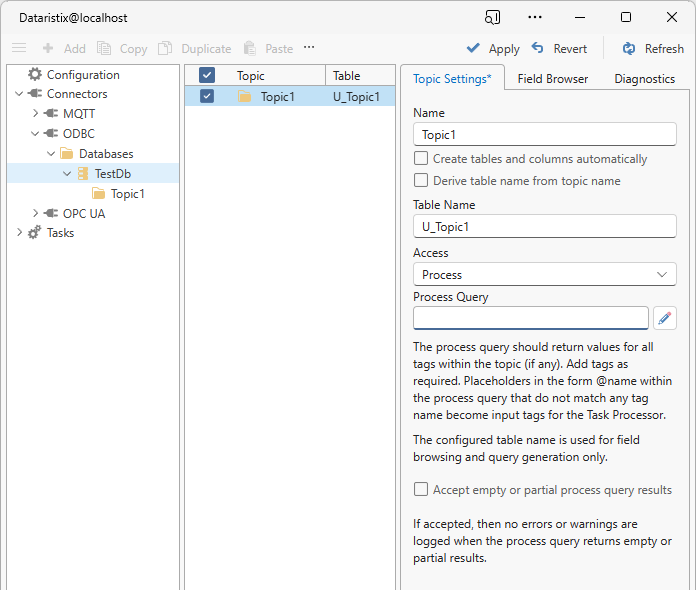
By default, warnings will be logged if the custom process query returns an empty result, and errors will be logged if the query returns a partial result. To avoid such warnings or errors, tick option “Accept empty or partial process query results”.
Tags that appear within the topic are the expected outputs of the process query. Use the field browser to drag tags into the topic or add tags manually by pressing the “Add” button. Additionally, the process query may contain placeholders for input tags. An example follows.
Batch Processing and Recipe Transfer
The following Process query returns values for fields SelectedRecipeKey, Data1, Data2 and Data3 and expects input RequestedRecipeKey, designated by placeholder @RequestedRecipeKey.
select RecipeKey as SelectedRecipeKey, Data1, Data2, Data3
from RecipeTable
where RecipeKey=@RequestedRecipeKey
The topic, in the following named “RecipeLookup”, must contain the expected output tags SelectedRecipeKey, Data1, Data2 and Data3. These can either be manually added to the topic (by pressing the “Add” toolbar button) or by dragging the tags from the field browser, provided that the configured table is browsable.
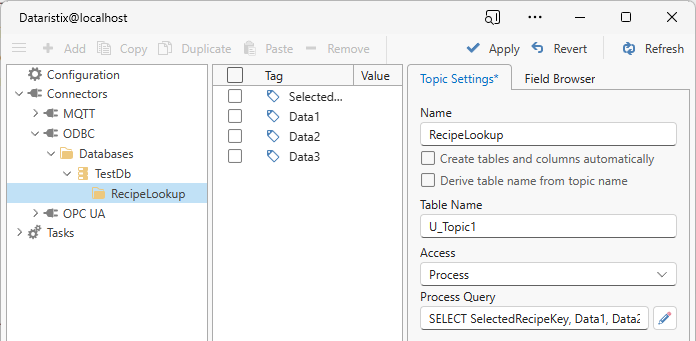
The topic will appear as a processor within the task builder with placeholder RequestedRecipeKey as input. The following task waits for the OPC UA tag RecipeKeyQueried to change, then looks up the corresponding recipe in the database by executing the process query, and finally writes the selected recipe back to corresponding OPC UA tags.

The Trigger input tag in the RecipeLookup processor is not used in this case since the process query only needs to be executed when the OPC UA tag changes.
To perform a handshake with the control program or OPC UA device, consider reserving a specific recipe key as a “reset” key. The device may then perform a handshake requesting the reset key, awaits the reset key to be returned in the RecipeKeyReturned tag, and can then proceed to request the next recipe.
Diagnostics
All database queries may be logged to a text file for diagnostics purposes. By default, no queries are logged. In general, the default logging visible within the Dataristix Core application should be sufficient to investigate errors, however, query logs may be useful for complex scenarios.
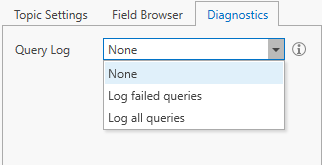
Query log options are:
- None
- The default; no queries are logged.
- Log failed queries
- Only failed queries are logged.
- Log all queries
- All queries are logged. This option may generate a lot of data and a warning is sent to the Dataristix Core Application log when enabled.
The data folder for query logs is the default connector log folder. Hover over the information icon to see the folder path.
Monitor Topics
Enable “Live Values” in the main application’s “View” menu to monitor the topic’s tag values. Live values are acquired according to the topic settings, (i.e. update rate) and are unavailable for Write-Only topics.
Remove Topics
Remove topics by selecting the database in the navigation panel, then select one or more topics to remove in the content panel, and finally click on the “Remove” toolbar button to remove selected topics.
Warning
Note that topics are also removed from any task using the topics.