Connecting to AWS IoT Core
Configure an AWS IoT Thing
This section assumes that you have an Amazon Web Services account. Before the MQTT connector can send data to AWS IoT Core, a “Thing” needs to be configured as a recipient of such data. In this example, a single “Thing” is created:
- Go to “IoT Core” in your Amazon Web Services console
- Under “AWS IoT”, expand menu option “Manage” and select “Things”.
- Click on button “Create Things”, select “Create single thing” and click “Next”.
- Enter a “Thing” name, for example “mqttconnector1” and click “Next”.
- Under “Device certificate”, keep option “Auto-generate a new certificate” selected and click “Next”.
- Click on button “Create policy” to create a security policy for the thing. Enter a name, for example “mqttconnector-policy”. In the “Create policy” form, click on “Advanced mode” and paste the following into the policy statement entry field to allow all IoT access (adapt to suit):
{
    "Version": "2012-10-17",
    "Statement": [
        {
        "Effect": "Allow",
        "Action": "iot:*",
        "Resource": "*"
        }
    ]
}
- Go back to the “Thing” creation steps and select the new policy.
- Click on button “Create thing”.
- In the next step, download the certificate and the public and private key files and keep them safe for later use.
- Click on “Done”. This concludes the configuration of the “Thing”.
- Note down your IoT Core device data endpoint. Click on “Settings” near the bottom of the AWS IoT menu to view the endpoint.
Trust the AWS IoT Certificate Authority
Certificates installed as trusted roots on the operating system are not automatically trusted by MQTT clients. Certificate authorities that should be trusted must be added to the MQTT connector’s Certificate Authority settings.
AWS IoT Core device data endpoints (of the form “xxxxxxxx-ats.iot.<region>.amazonaws.com”) use server certificates issued by “Amazon Trust Services”. Obtain the “Amazon Root CA 1” certificate directly from Amazon rather than exporting it from a TLS connection in the browser, so that you can be sure the certificate has not been substituted along the way:
Download the “Amazon Root CA 1” certificate (RSA 2048 bit key) in PEM format from the Amazon Trust Services repository at https://www.amazontrust.com/repository/, or from the links in the AWS IoT documentation on server authentication. The root CA certificate may also be offered for download together with the device certificate when creating the “Thing” (see step 9 above).
Verify the downloaded certificate before importing it. On Windows, double-click the file, select the “Details” tab and compare the “Thumbprint” (shown by Windows as the SHA-1 value) with the value published in the Amazon Trust Services repository. Alternatively, if OpenSSL is available, run:
openssl x509 -in AmazonRootCA1.pem -noout -subject -enddate -fingerprint -sha256
and compare the SHA-256 fingerprint. Do not import the certificate if the fingerprint does not match.
In Dataristix, open the MQTT connector’s root configuration settings and, under “Certificate Authority”, click the “Add” toolbar button. Select the downloaded file as the certificate file and leave the key file blank; the certificate authority’s private key is not needed to trust server certificates.
Confirm that “Amazon Root CA 1” is now listed as a certificate authority.
Note
AWS recommends trusting all Amazon Trust Services root certificates. If your connection fails with only “Amazon Root CA 1” configured, also add “Amazon Root CA 3” (ECC 256 bit key) from the same repository in the same way.
Configure the MQTT client
MQTT clients can be configured manually to connect to AWS IoT Core or with “IoT Assistance”. The following steps describe the steps taken when choosing “IoT Assistance”.
Create an MQTT client with default settings, select the client’s “Configuration” node in the navigation panel, and click the “IoT Assistance” button in the toolbar.
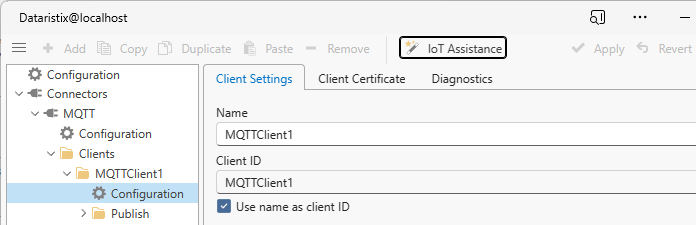
This will show the following dialog.
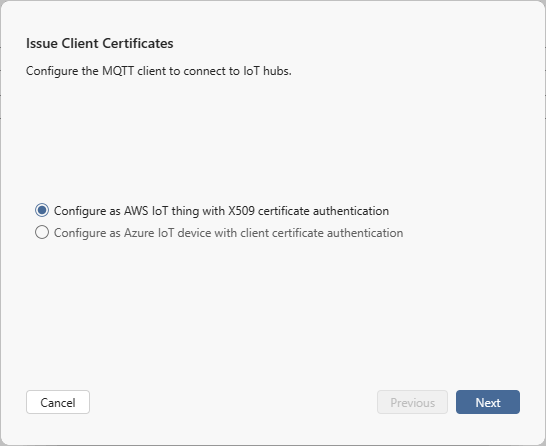
Keep the “AWS” option selected and click “Next”.
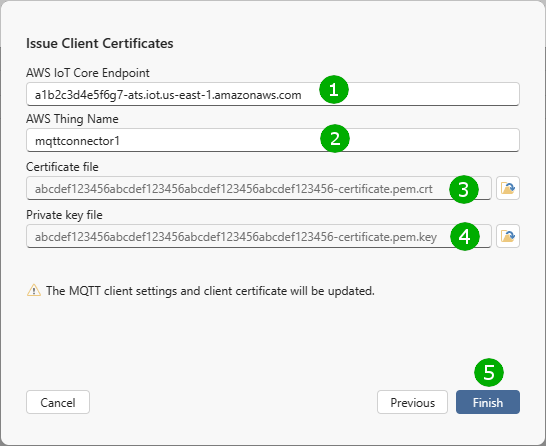
Fill in the required details:
( 1 ) Enter the AWS IoT device endpoint.
( 2 ) Enter the Thing name as configured in AWS IoT Core.
( 3 ) Locate the Thing certificate file previously downloaded.
( 4 ) Locate the Thing certificate’s private key file as previously downloaded.
Finally, click “Finish” ( 5 ) to configure the MQTT client.
You can now review the settings and test the connection.
Note
Test the connection using the actual MQTT client ID, not a randomized client ID. If the connection fails because the AWS IoT server certificate is not trusted, ensure that the certificate authority has been added as described in Trust the AWS IoT Certificate Authority. For testing purposes only, you can also check “Accept any server certificate” in the MQTT client configuration.