Topics
Add Topics
Each CSV Connector topic refers to a subfolder within the local computer’s data root folder; adding topics means adding a new subfolder storage location for CSV files once data collection begins.
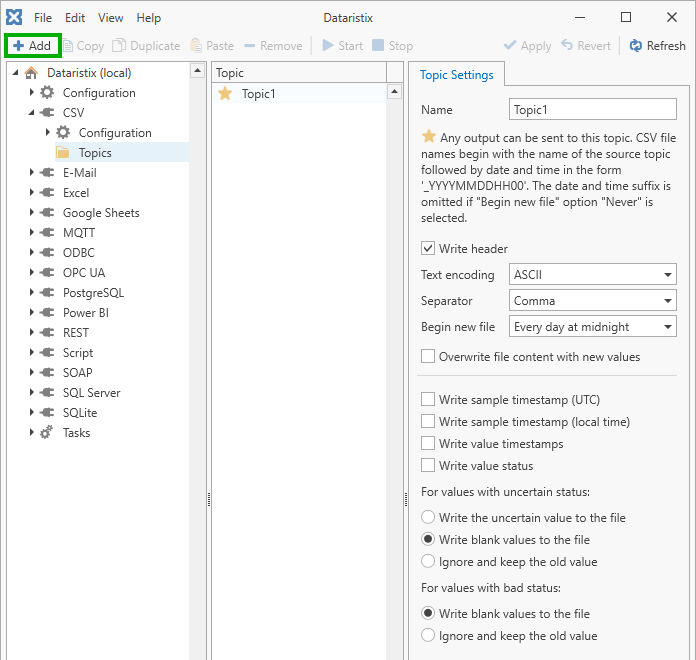
To add topics, click the “Add” button with the CSV connector’s “Topics” node selected in the main application’s nagivation pane.
CSV connector topics are are always write-only and they are “Generic” topics which means that there are no individual tags or tag mappings required. When a task is configured to send input connector topics to a CSV Connector topic then a file is created for each incoming topic and the file will store comma separated values for all input topic tags.
CSV files are named after the input topic name with a suffix denoting the current log period in format “YYYYMMDDHH00” where “YYYY” denotes the four-digit year, “MM” the two-digit month, “DD” the day of the month, and “HH” the hour of the day in 24-hour format. For example, an input topic called “MyOpcUaTopic1” may be stored in a file called “MyOpcUaTopic1_202003311300.csv”.
Usage example
The following image shows an example. The task is configured to receive data from OPC UA topics “Machine1”, “Machine2” and “Machine3” and all values are stored into the same log folder named after CSV topic “MachineLogs”.
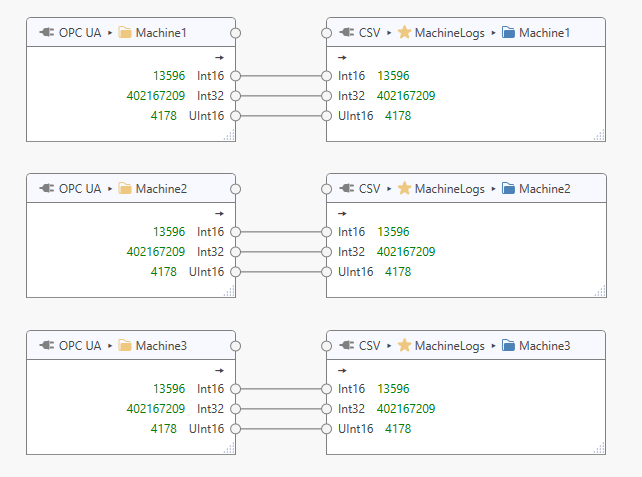
The data root folder will contain a “MachineLogs” subfolder, and values for each OPC UA topic are stored into separate files. After a while the “MachineLogs” folder may contain, for example:
Machine1_202003310000.csv
Machine1_202004010000.csv
Machine1_202004020000.csv
Machine2_202003310000.csv
Machine2_202004010000.csv
Machine2_202004020000.csv
Machine3_202003310000.csv
Machine3_202004010000.csv
Machine3_202004020000.csv
Topic Settings
For each topic you can configure:
- Name
The topic’s name. A corresponding subfolder within the data root folder will be created once data sampling begins.
- Write header
Tick this option to write column titles corresponding to the tag names of input topics. Note that the CSV connector waits for a full dataset to be received before the header is written and logging begins. This is required to determine the number of elements for any potentially arriving array-type values. Once the number of array elements is determined, subsequent logging of the array values is limited to the initially determined number of elements.
- Text Encoding
Select a text encoding for the CSV file.
- ASCII
- You may want to opt for ASCII format for purely numerical data logging.
- UTF-8
- Use UTF-8 if the data to be logged contains string type values containing characters outside of the ASCII character set.
Note that any tag names or string type values must not contain the chosen separator character.
- Separator
Select comma, semicolon or tab as a value separator. Note that this does not change the decimal point character. The decimal point character is determined by regional settings of the computer running Dataristix.
For comma or semicolon separators you may also include a one line indicator that Microsoft Excel interprets to be the value separator for the file. The indicator line added as the first line of each file is either
sep=,
or
sep=;
respectively.
- Begin new file
A new log file is started either for each new hour or for each new day (in local time), or never (always writing to the same file). Note that new files are only created when value updates arrive. For example, when new files should be started every hour and there are no new value updates for more than one hour then there will be no file for the hour without updates. Similarly, if an update does not arrive until half an hour after the start of the new hour then there will be no file present for the first half hour.
If option “Never” is selected, then the target file name does not contain a date and time suffix. For example, for CSV topic “Topic1” the target file may simply be named “Topic1.csv”.
- Overwrite file content with new values
When this option is checked, then the target file will contain one line of values only (plus an optional header line). When new values arrive, then the file is truncated to zero length and the optional header and new values are written to the file.
- Delete files older than
Check this option to automatically delete CSV files older that the given number of days.
- Write sample timestamp (UTC)
Ticking the option will write a timestamp in UTC (Universal Time Coordinated) to the file.
- Write sample timestamp (local time)
Ticking the option will write a timestamp in local time to the file.
- Write value timestamps
If ticked then timestamps for each individual value are written to the file.
- Write value status
If ticked then the status code (as per OPC UA definition) for each individual value is written to the file.
- Uncertain value options
- Write the uncertain value to the file
- When a tag value with “uncertain” status is received (following the OPC UA meaning of “uncertain”) then the uncertain value is written to the file like a “good” value would be.
- Write blank values to the file
- When a tag value with “uncertain” status is received then a blank value is written instead.
- Ignore and keep the old value
- When a tag value with “uncertain” status is received then it is ignored. The old value remains in the cache to form full datasets and continues to be written into the file.
- Bad value options
- Write blank values to the file
- When a tag value with “bad” status is received (in the OPC UA sense) then a blank value is written instead.
- Ignore and keep the old value
- When a tag value with “bad” status is received then it is ignored. The old value remains in the cache to form full datasets and continues to be written into the file.
Note
The CSV Connector holds a write lock on target file and file readers need to open the file in read-only mode. New CSV values are flushed to disk after writing to the file. This means, as long as the line of values fits into the default file buffer (4096 kB), then a file reader will see consistent sets of data. With option “Overwrite file content with new values” selected, file readers may also encounter an empty file while it is in the truncated state.
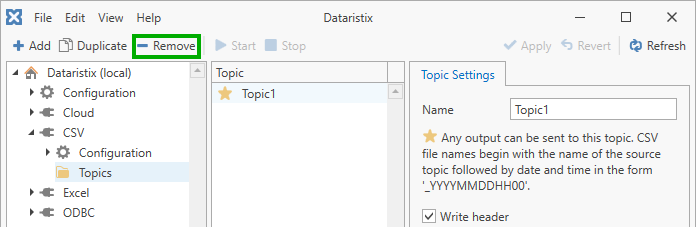
Remove Topics
Remove topics by selecting “Topics” in the navigation panel, then select one or more topics to remove in the content panel, and finally click on the “Remove” toolbar button to remove selected topics.
Warning
Note that topics are also removed from any task using the topics.